Friday, April 6, 2012

Instant Pendant Lights!


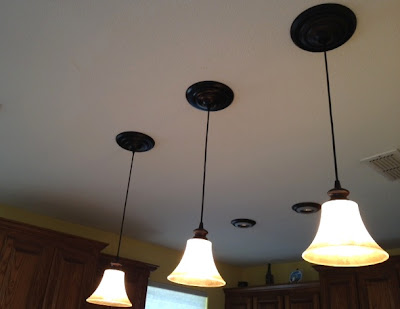
This kitchen ceiling sports three instant pendant lights in a bronze finish.

Do you like the look of pendant lights but don't want to mess with electrical wiring? If so, you can buy what are called instant pendant lights that connect to your existing recessed lighting fixtures. The cord length is adjustable. It is kind of tricky to try to get them even, but you can make adjustments to get pretty close.

I have three such recessed lighting fixtures over the bar in my kitchen. They previously had the standard white ring on the outside and an ugly flood light bulb. I bought instant pendant lights in a bronze coating with antique style glass shades to replace them. The glass color is called 'Parchment,' which provides a nice, warm glow. The style fits well with my decor.

These lights came with an adaptor that allows you to use the existing light socket. The entire fixture fits right over the ring that surrounds the socket on the ceiling.

They use standard light bulbs (up to 75 watts each), which are much more attractive than the flood lights. The bulbs are lower now, too, making it easier to switch them out when it's time.  

I bought mine at Improvements Catalog for about $35 each. They sometimes go on sale, or you can get a discount for buying two or more. Considering how much it can cost to have an electrician install new fixtures, or how much it might cost a brave DIY'er in medical bills if they get electrocuted, I'd say that's a great deal!

You can also buy them at Solutions and Home Decorators Collection. Home Depot is also carrying some now, but I believe at this time they are only available online and are not sold in their stores.

You will have to periodically adjust the pendant fixtures, as they tend to slide away from the ceiling ring. It can be kind of a nuisance, but again, it's minor compared to the costs involved in changing the fixtures. This is especially the case if you have high ceilings. How often do you look up and notice things light that anyway? I only worry about adjusting them when I have guests.   

light bulb idea graphic
Now that's a bright idea!

Sunday, January 22, 2012

The Lost Art of Making Popcorn


Popcorn is still America's favorite snack for watching movies, and generally one of the healthiest in terms of whole grain and fiber.  Yet people don't seem to make it themselves so much anymore.  It's easy to throw a bag of popcorn into the microwave, but it's not complicated or time consuming to make it yourself!

Consider that most brands of microwave popcorn contain artificial flavorings and preservatives that we just don't need.  I've noticed I get a sort of gritty coating on the roof of my mouth when I eat it.  What's that about?  And what does "natural butter flavor" mean anyway?  As far as labeling rules go, it could mean that it contains less than 2% of real butter.  Then consider that some contain partially hydrogenated oils.  There are good reasons to be especially concerned about the "movie theater tub" style popcorn, because of the amount of calories and fat it contains.

But making popcorn yourself at home is cheap and easy, and without the bright yellow artificial coloring!  To do so, follow the instructions on the package.  This is how I make two servings:

************

Put a heaping tablespoon of oil in a 4-quart saucepan over medium high heat, add 3 kernels of popping corn and put the lid on the pan.  (Adjust the pan size and amounts accordingly to make more servings.)

As far as oils go, I prefer extra virgin coconut oil (NOT refined or hydrogenated).  It works well at high temperatures and has a light, characteristically coconut smell and flavor, as opposed to olive oil or other vegetable oils like canola.  Don't let the fact that it contains saturated fat scare you; a small amount won't hurt.  Consider all the people living in tropical climates who depend on coconuts as a dietary staple.

When those kernels have popped, pour 1/3 cup of popping corn into the pan and put the lid back on it.

For electric stoves, you will need to frequently move the pan around on the burner from the time you hear them start to pop until they start to slow to about a second between pops, to ensure they don't burn.  Remove the pan from the burner.

For gas stoves, when the kernels are popping, you just need to take the pan off the heat a couple of times and shake it.  When they slow to about a second between pops, turn off the heat and remove the pan from the burner when the popping completely stops.

Pour into a large bowl and add whatever seasonings you want.  YOU control the amount.  I like to add sea salt, cracked black pepper and fresh grated parmesan cheese.  But you could add whatever flavors you like, if any.

************
Happy snacking!  (Was that corny?)  ;-)

Thursday, December 29, 2011

From Cluttered to... Classy!

I have a narrow pantry, and especially at this time of the year, it gets filled quickly with flour, sugar, cocoa, soups, oils, nuts, chocolate chips, etc.  I also like to bake bread, so I have several different kinds of flours for that.  Needless to say, things have been piling up, and it has been difficult to see what is in the back of the pantry without moving everything in the front out of the way!

Before
I decided it was time to do a little reorganization.  I did a bit of research online and found various items for stacking and storing items.  First, I bought a 3-tiered organizer to stack oils, vinegars and honey bottles.  I rearranged spices and baking items on a turntable.  I bought a spice rack to attach to the door, but it wouldn't attach properly with the grooves in the door, so back to the store it went.  

Then I came across these great Pop Containers by OXO.  They come in various sizes with descriptions of what products best fit them (like a 1-lb bag of coffee beans fits nicely in the 1.5 quart size container).  They are see-thru, stackable, easy to clean, and they provide a good seal to protect your food.  I bought containers for cereal, bread flours, brown sugar, popcorn and coffee.  Buying a few at a time allowed me to get a better estimate as to which other size containers I would need and how I could better organize items.

OXO Pop Container - 1.5 quarts

Just push the top button down to seal.
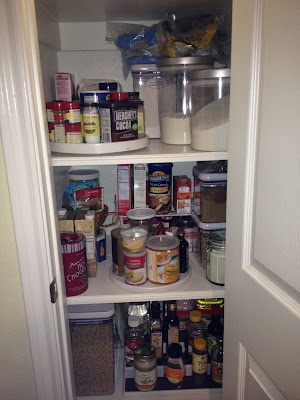
Below is my first stab at reorganizing.  I already had a few plastic and glass jars or tins which I used in addition to the OXO containers, as they are a bit expensive.  If you have shelves that are taller than mine, the stackable feature becomes even more useful for saving space in your pantry or cabinet.  I also had a stacking shelf for soups and other items that I kept.  It was previously blocked by all the items in front of it, which could spell trouble for those of us who buy what we don't realize we already have, because it's 'out of sight, out of mind!' 

Halfway there
After evaluating what I did so far, I determined that the round flour and sugar canisters I had weren't going to work.  By replacing them with the OXO rectangular containers, they fit more snugly together, saving more room for the other items on the shelf.  I decided that the single turntables weren't doing enough to take advantage of the vertical space, so I bought a double turntable for the top shelf to hold my spices and other baking items like cocoa and baking powder, and I 'Goodwilled' the single ones.

After
Well, what do you think?  It's kind of eccentric with the different organization styles, but it's much less chaotic!  I can find things easier now, and the loose items like flours, sugars, cereal and pasta stack nicely side-by-side.


Shopping notes:  You can buy the containers (and other pantry organizers like the ones in the picture) at    Container Store, Bed Bath and Beyond, Williams Sonoma and World Market.  They run about $10 for the 1.5 quart size container up to $19 for the 5.5 quart (the size I bought for cereal).  You can label the containers if you need to for easy identification.  I just bought a couple of sheets of kitchen labels from Container Store.